
Splint Bandage: Essential Guide for Emergency Care
When someone sustains a suspected fracture or severe sprain in an emergency situation, proper immobilization can mean the difference between a straightforward recovery and serious complications. A splint bandage serves as a critical tool in emergency care, providing the rigid support and stabilization needed to prevent further injury during transport to medical facilities. Whether you're a first responder, outdoor enthusiast, or simply preparing your household for emergencies, understanding how to properly select, apply, and secure a splint bandage is an essential skill that could protect someone from permanent damage. This comprehensive guide explores the principles, techniques, and best practices for effective splint application in emergency scenarios.
Understanding Splint Bandage Fundamentals
A splint bandage combines two essential components: a rigid or semi-rigid support structure and secure wrapping material that holds the injured limb in a stable position. Unlike casts that completely encircle an injury, splints allow for swelling and can be adjusted, making them ideal for emergency situations where initial assessment may be incomplete.
The primary purpose of any splint bandage is immobilization. When bones break or joints become severely injured, movement causes additional tissue damage, increases pain, and can lead to complications such as nerve damage or excessive bleeding. By restricting motion at the injury site and the joints above and below it, a properly applied splint bandage minimizes these risks.
Key Components and Materials
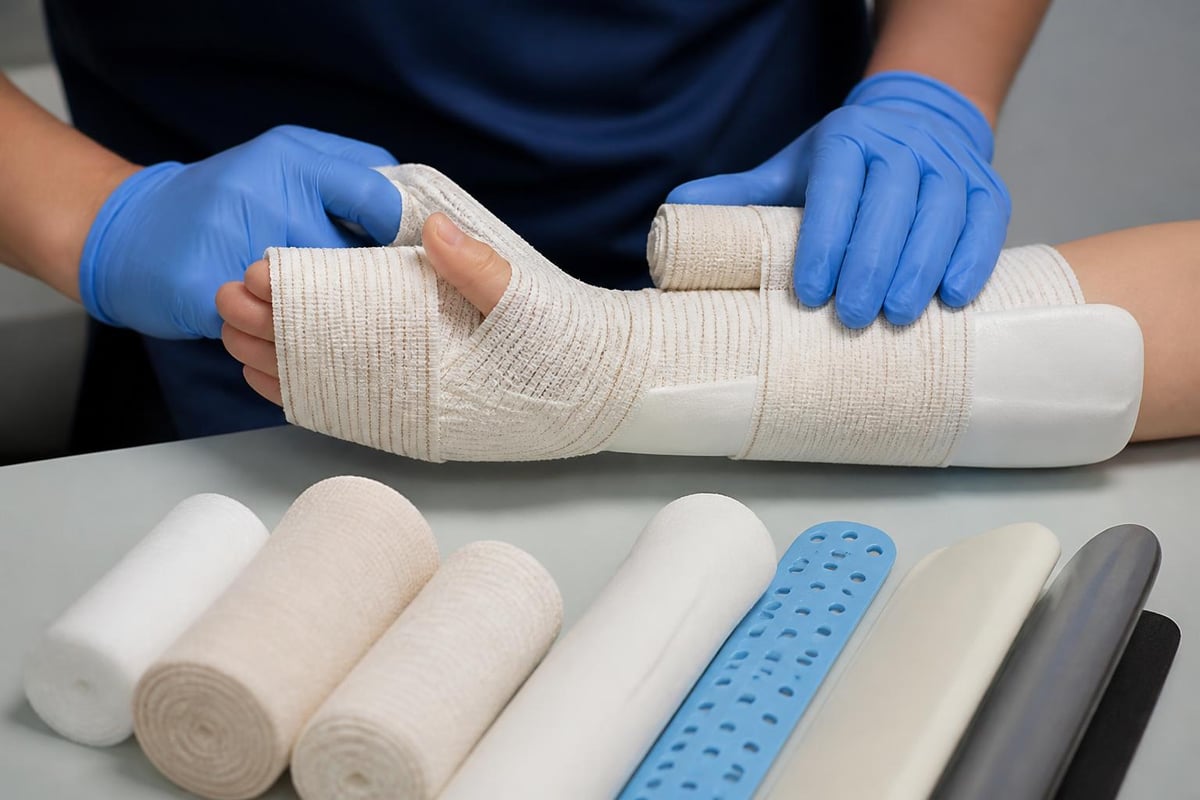
Effective splint bandages require both structural support and securing materials. The rigid component can include commercial splints made from aluminum, plastic, or foam, or improvised materials such as boards, rolled magazines, or even tree branches in wilderness settings.
Common splint materials include:
- SAM splints (moldable aluminum with foam padding)
- Rigid plastic or fiberglass boards
- Padded aluminum strips
- Air splints (inflatable immobilizers)
- Improvised materials (cardboard, newspapers, sticks)
The bandaging component typically consists of elastic wraps, triangular bandages, or medical tape. These materials secure the rigid support while allowing some flexibility for swelling. Including proper splinting materials in your first aid kit necessities ensures you're prepared for orthopedic emergencies.
Indications for Splint Bandage Application
Knowing when to apply a splint bandage is as important as knowing how to apply one. Splinting has specific indications in emergency medicine, and proper assessment determines whether this intervention is appropriate.
Primary Indications
Suspected fractures represent the most common indication for splint bandage use. When someone experiences significant trauma to a limb and displays signs such as deformity, inability to bear weight, severe pain, or abnormal mobility, assume a fracture until proven otherwise through imaging.
Severe sprains and dislocations also benefit from splint immobilization. These soft tissue injuries involve significant damage to ligaments and supporting structures, and movement can worsen the injury or delay healing.
| Injury Type | Splinting Priority | Immobilization Goal |
|---|---|---|
| Open fractures | High (after bleeding control) | Prevent bone movement |
| Closed fractures | High | Reduce pain and complications |
| Severe sprains | Medium | Limit joint movement |
| Dislocations | High | Splint as found position |
| Crush injuries | Medium | Prevent further tissue damage |
Special Circumstances
Certain situations require modified approaches to splint bandage application. For open fractures where bone protrudes through skin, controlling bleeding takes precedence, but splinting follows immediately to prevent the bone from retracting and becoming contaminated. Understanding how to stop a major bleed becomes crucial in these compound injury scenarios.
Joint injuries present unique challenges because splinting should occur in the position found rather than attempting to straighten deformed joints. This principle prevents additional damage to nerves and blood vessels that may be compressed or stretched.
Step-by-Step Application Techniques
Proper splint bandage application follows a systematic approach that prioritizes safety, effectiveness, and patient comfort. Following established first aid steps ensures optimal outcomes while minimizing risks.
Pre-Application Assessment
Before applying any splint bandage, assess circulation, sensation, and movement (CSM) distal to the injury. Check the pulse beyond the injury site, ask if the patient can feel light touch, and request gentle finger or toe wiggling. Document these findings to compare after splinting.
Remove jewelry, watches, and constrictive clothing from the affected limb before swelling occurs. These items can become tourniquets as tissue expands, cutting off circulation and causing additional complications.
Application Process
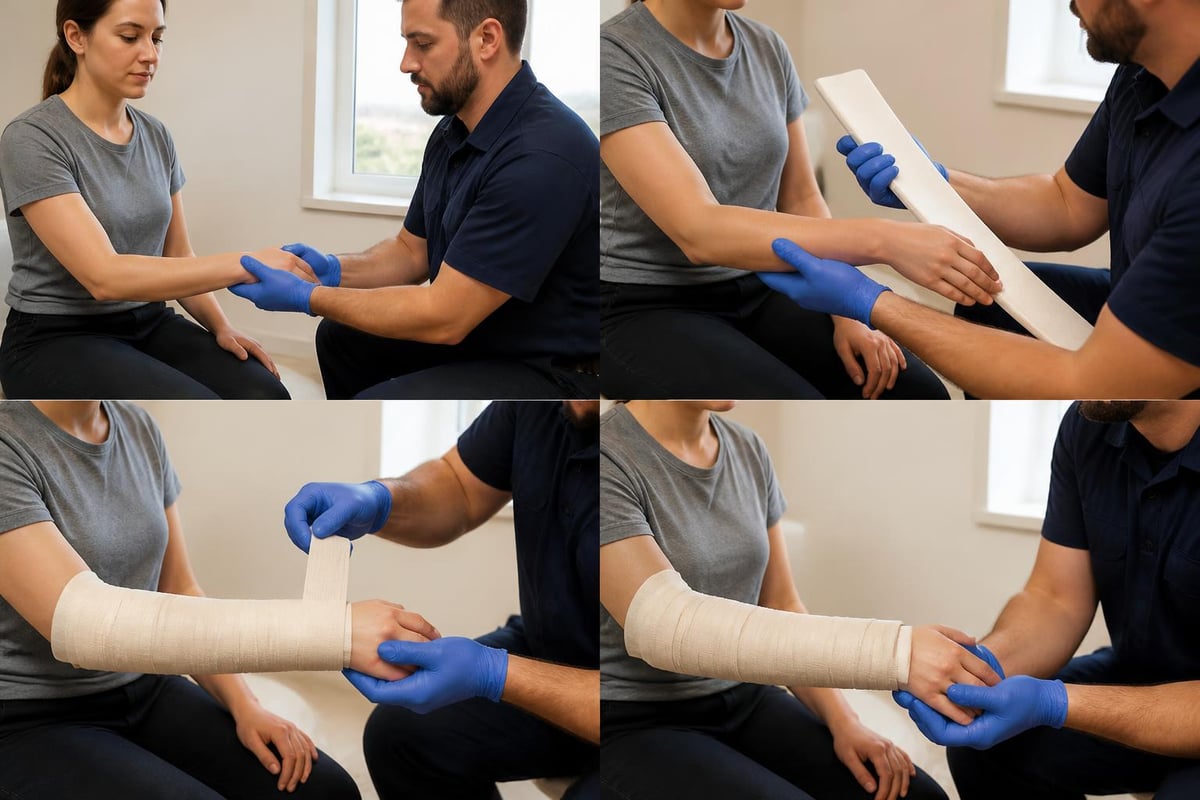
Step 1: Gather Materials Assemble your rigid support material and securing bandages before touching the injured limb. Having everything ready minimizes movement and handling.
Step 2: Position the Limb Support the injury in its current position without attempting to realign or straighten it. For extremity fractures, gently position the limb to allow splint placement while maintaining patient comfort.
Step 3: Add Padding Place soft padding between the splint and skin, particularly over bony prominences. This prevents pressure sores and increases comfort during transport.
Step 4: Apply Rigid Support Position the splint to immobilize the joint above and below the injury site. For a forearm fracture, the splint must extend from the hand to above the elbow.
Step 5: Secure the Splint Wrap the bandaging material around the splint and limb, starting at the point furthest from the body and working toward the trunk. Maintain firm but not tight pressure that allows circulation.
Step 6: Reassess CSM Check circulation, sensation, and movement again after application. If any aspect has worsened, loosen the bandaging immediately.
Common Types and Their Specific Uses
Different injuries require different splinting approaches. Understanding the various types of splint bandages available helps you select the most appropriate option for specific situations.
Upper Extremity Splints
Hand and wrist injuries frequently require specialized approaches. Hand splints often position the hand in a "position of function" where fingers curve naturally as if holding a small ball. This position prevents stiffening of joints during healing.
Sugar tong splints work particularly well for forearm fractures, wrapping from the hand up the forearm, around the elbow, and back down to prevent rotation. For wrist-specific injuries, wrist splints typically maintain neutral positioning to reduce strain on damaged structures.
Lower Extremity Splints
Ankle and foot injuries benefit from posterior splints that support the back of the leg and extend beneath the foot. These prevent both up-and-down movement and side-to-side motion.
For knee injuries, long leg splints extending from hip to ankle provide comprehensive immobilization. Femur fractures, among the most serious extremity injuries, require traction splints that apply gentle pulling force to overcome muscle spasms and reduce pain.
Specialized Commercial Options
Modern splint bandage technology offers several advanced options beyond traditional rigid boards. SAM splints feature moldable aluminum covered with foam padding, allowing rescuers to create custom shapes for specific injuries. Air splints use inflation to provide circumferential support and gentle compression.
Critical Errors to Avoid
Even experienced first responders can make mistakes when applying splint bandages under pressure. Understanding common errors helps you avoid complications that could worsen patient outcomes.
Over-Tightening and Circulation Compromise
The most dangerous mistake involves wrapping the securing bandage too tightly. Swelling naturally occurs after injury, and bandages that seem appropriately snug initially can become tourniquets within minutes. Always leave enough space to slip a finger beneath the wrapping, and instruct patients to report any numbness, tingling, or color changes immediately.
Warning signs of compromised circulation:
- Pale or blue skin color
- Decreased temperature of extremity
- Absent or weak pulse
- Numbness or tingling
- Inability to move fingers or toes
Inadequate Immobilization
Conversely, some rescuers apply splints that don't properly restrict movement. Remember that effective splint bandages must immobilize the joint above and below the injury site. A splint that only covers the fracture site itself will still allow movement at adjacent joints, defeating the purpose of immobilization.
Attempting to Realign Injuries
Unless you have specific training in reduction techniques, never attempt to straighten or realign an injured limb. "Splint as found" remains the golden rule. Attempts to realign fractures or dislocations can sever blood vessels, damage nerves, or drive bone fragments through skin.
Splint Bandage Care and Monitoring
Once applied, a splint bandage requires ongoing monitoring and appropriate care, particularly during extended transport or when professional medical care is delayed.
Patient Instructions
Patients wearing splint bandages need clear instructions about care and warning signs. Elevation above heart level reduces swelling and pain. Ice application, using a barrier to protect skin, decreases inflammation during the first 48 hours.
Splint care tips emphasize keeping the splint dry and clean. Moisture weakens materials and can cause skin breakdown. If the splint becomes wet, it may need replacement or professional adjustment.
Monitoring for Complications
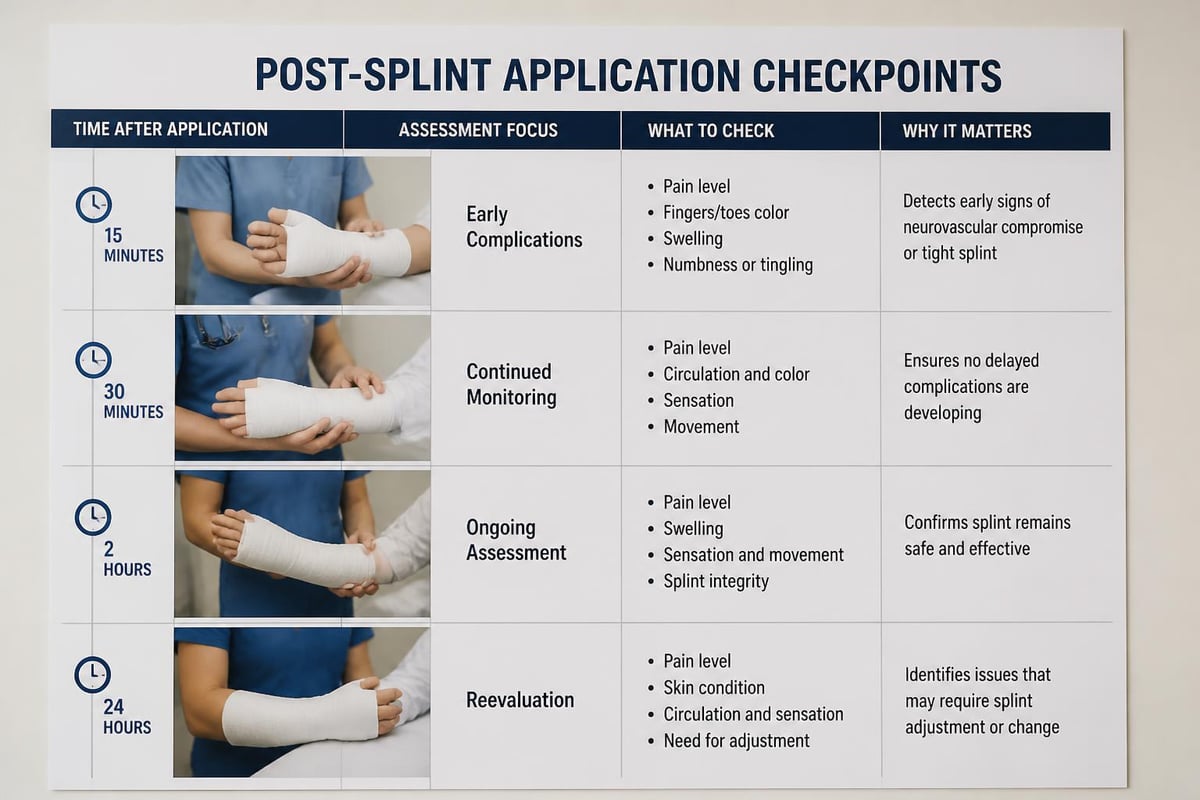
Continuous monitoring for complications is essential, especially in wilderness or prolonged transport scenarios. Compartment syndrome, a serious condition where pressure builds within muscle compartments, can develop hours after injury and initial splinting.
| Time After Splinting | Assessment Focus | Action Required |
|---|---|---|
| Immediate | CSM baseline | Document findings |
| Every 15 minutes (first hour) | CSM changes | Loosen if compromised |
| Hourly thereafter | Pain level, swelling | Adjust as needed |
| Before transport | Splint security | Re-secure if loose |
Regular CSM checks remain crucial throughout care. Any deterioration in circulation, sensation, or movement warrants immediate reassessment and potential splint adjustment.
Integration with Comprehensive Emergency Kits
A splint bandage represents just one component of comprehensive emergency preparedness. Integrating splinting supplies into your overall first aid strategy ensures you can respond effectively to orthopedic emergencies.
Kit Assembly Considerations
When building or purchasing emergency medical kits, consider the environments and activities where you'll deploy them. A portable medical kit for hiking requires lightweight, compact splinting options, while vehicle-based kits can accommodate bulkier, more comprehensive supplies.
Essential splinting supplies for different kit types:
- Basic home kit: 1 SAM splint, elastic bandages, triangular bandages
- Vehicle kit: 2 SAM splints (different sizes), air splint, elastic wraps, tape
- Wilderness kit: 1 compact SAM splint, duct tape, elastic wrap, improvisation knowledge
- Professional response kit: Multiple sizes of commercial splints, specialized joint splints, comprehensive securing materials
The contents of IFAK (Individual First Aid Kit) for tactical or professional use should include at least basic splinting capability, though hemorrhage control takes priority in these configurations.
Training and Skill Maintenance
Purchasing splinting supplies represents only the first step. Regular training and practice ensure you can apply these tools effectively under stress. Many medical supply companies offer training resources, and organizations like the American Red Cross provide certification courses in first aid that include splinting techniques.
Practice sessions should cover both commercial splint application and improvised techniques. Wilderness emergencies may not provide access to purpose-built supplies, making improvisation skills invaluable. Learning to create effective splint bandages from materials like magazines, boards, or clothing can prove lifesaving in remote scenarios.
Professional Applications and Advanced Techniques
While basic splint bandage application follows principles accessible to lay rescuers, professional medical providers employ advanced techniques that optimize patient care in specific situations.
Pre-Hospital Emergency Care
Paramedics and EMTs utilize splinting as a standard intervention for suspected fractures. Understanding the indications and methods used by professionals helps bridge the gap between lay first aid and advanced care.
Professional responders carry specialized equipment including traction splints for femur fractures, vacuum splints that conform to any limb shape, and pneumatic anti-shock garments that provide both splinting and blood pressure support for pelvic fractures.
Hospital and Clinical Settings
Within hospital settings, healthcare providers apply splints for post-procedural immobilization, temporary stabilization before surgery, or ongoing support during healing. These applications often use more sophisticated materials and techniques than field applications require.
Clinical splinting may incorporate custom molding, specialized padding systems, and precise positioning to achieve therapeutic goals beyond simple immobilization. Physical and occupational therapists design splints that maintain range of motion in some joints while restricting it in others, supporting functional recovery.
Special Population Considerations
Applying splint bandages to certain populations requires modified techniques and additional considerations to ensure safety and effectiveness.
Pediatric Patients
Children present unique challenges in splint bandage application. Their smaller anatomy requires appropriately sized materials, and their higher anxiety levels demand extra care in explanation and reassurance. Growth plate injuries, specific to pediatric patients, may not display obvious deformity but still require splinting and medical evaluation.
Pain management becomes particularly important with pediatric patients. While adults can often tolerate some discomfort during splint application, children's cooperation depends heavily on minimizing pain throughout the process.
Geriatric Considerations
Elderly patients often have fragile skin that tears easily, requiring extra padding and gentle handling during splint bandage application. Osteoporosis increases fracture risk from minimal trauma, meaning even seemingly minor falls may result in significant injuries requiring splinting.
Cognitive impairment in some elderly patients may limit their ability to report symptoms or follow care instructions. Caregivers need thorough education about monitoring and when to seek help.
Bariatric Patients
Patients with obesity require larger splint materials and additional securing supplies. Standard-sized commercial splints may not adequately span larger limbs, necessitating custom solutions or multiple splints positioned side-by-side.
Building Your Emergency Response Capability
Developing comprehensive emergency response capability involves more than accumulating supplies. It requires integrating equipment, knowledge, and systematic preparation into a cohesive readiness plan.
Equipment Selection Strategy
Choose splinting supplies based on realistic risk assessment. A family living in an urban area with rapid EMS access needs less extensive supplies than a remote ranch or wilderness guide service. However, even basic preparedness should include some splinting capability.
Professional-grade trauma kits from reputable suppliers ensure you receive quality materials that perform reliably under stress. Paramedic-operated companies bring real-world experience to product selection, choosing items that actually work in emergency scenarios rather than just looking appropriate.
Systematic Preparation Approach
Effective emergency preparedness follows a systematic approach:
- Risk assessment: Identify likely injury scenarios based on activities and environment
- Equipment acquisition: Purchase appropriate supplies from reliable sources
- Training completion: Obtain formal instruction in splinting techniques
- Practice sessions: Regularly practice skills to maintain proficiency
- Kit maintenance: Inspect and replace supplies according to expiration dates
- Plan review: Periodically update your approach based on new information or changed circumstances
Resource Integration
Your splinting capability should integrate with broader emergency preparedness, including communication plans, evacuation routes, and coordination with professional emergency services. Knowing when to apply a splint bandage is important, but knowing when and how to activate professional help is equally critical.
Maintaining relationships with medical professionals, participating in community emergency response teams, and staying current with best practices through continuing education all contribute to effective emergency response capability.
Understanding proper splint bandage application techniques, from assessment through monitoring, equips you to respond effectively when someone sustains a serious musculoskeletal injury. Whether you're preparing for wilderness adventures, building workplace safety programs, or simply ensuring your household can handle emergencies, quality splinting supplies combined with solid training provide the foundation for effective orthopedic first aid. Medical Gear Outfitters offers paramedic-selected splinting supplies and comprehensive emergency kits designed by professionals who understand what actually works in real-world scenarios, ensuring you have both the equipment and expertise to respond confidently when seconds count.

